RAG (Retrieval-Augmented Generation) - Implementation

Medical reports are written for doctors - not for patients.
If you’ve ever looked at a blood test report and felt confused, anxious, or overwhelmed, you’re not alone. That gap between medical data and patient understanding is the problem MediTwin aims to solve.
This is an end-to-end guide to building a real application.
Instead of focusing on interview-style system design, it focuses on the actual flows and decisions required to build the system in practice.
Code is discussed conceptually, with selective snippets only where they help explain the application flow, trade-offs, and best practices — keeping the focus on architecture, reasoning, and real-world design choices.

MediTwin Video Demo
Video Link: Application Video Demo
Problem Statement
Patients receive complex medical reports and prescriptions filled with medical jargon. This causes:
Misinterpretation of results
Delayed medical follow-ups
Anxiety and confusion
Complete dependence on doctors for basic explanations
At the same time, doctor availability is limited, especially in rural and low-resource regions.
The Core Question
Can we help patients understand their medical data without replacing doctors?

Solution Overview: MediTwin
MediTwin is an AI-powered medical digital twin assistant that helps patients:
Understand medical reports in simple language
Ask safe follow-up questions
Track health trends over time
Interpret prescriptions responsibly
The system is built using a RAG (Retrieval-Augmented Generation) architecture to ensure accuracy and trust.
Business Requirements
Before writing any code, clear business boundaries were defined to ensure safety, trust, and scalability.
What the System Must Do
Explain medical values clearly
Present lab values and medical terms in simple, understandable language.Provide source-grounded answers
All explanations must be backed by trusted medical references or verified datasets.Track historical health data
Maintain report-wise and time-based health records for trend analysis.Be cost-aware and scalable
Optimize token usage, storage, and inference costs to support long-term growth.
What the System Must NOT Do
Diagnose diseases
The system must avoid diagnostic conclusions or medical judgments.Replace doctors
It should support understanding, not act as a medical professional.Provide emergency advice
No urgent or life-critical recommendations are allowed.
Business Rules
| Rule | Why It Matters |
| Non-diagnostic responses | Ensures patient safety |
| Trusted data sources only | Maintains accuracy and credibility |
| Clear medical disclaimers | Meets legal and ethical standards |
| Token usage limits | Controls operational costs |

Core Use Cases
Primary Use Cases
1. Medical Report Upload and Understanding
- Users can upload blood test reports (PDF or images), after which the system extracts medical data using OCR, structures it into standard fields, highlights abnormal values, and generates a clear, plain-language summary with key findings and explanations.
2. Interactive Medical Q&A and Insights
- Users can ask context-aware questions like why a value is abnormal or what should be done next. The system provides source-grounded, non-diagnostic insights, actionable guidance, and suggested follow-ups without replacing medical professionals.
3. Report-wise Health Dashboard and Trends
- Each report gets a dedicated dashboard showing visual charts, abnormal markers, and comparisons with previous reports, helping users understand patterns and changes over time.
Secondary Use Cases
1. Prescription and Medication Understanding
- The system helps users understand prescriptions by extracting medicine names, explaining their purpose, clarifying instructions, and presenting dosage schedules in a simple, structured way.
2. Preventive and Long-Term Health Awareness
- Based on historical data, users receive preventive lifestyle insights such as diet, activity, and sleep recommendations, along with long-term trend tracking to support informed health awareness.
System Flow (High Level)
MediTwin follows a standard RAG pipeline:
User uploads a medical document
Text is extracted using OCR
Data is cleaned, chunked, and stored
Relevant medical context is retrieved
LLM generates a grounded explanation
User interacts via chat or dashboard
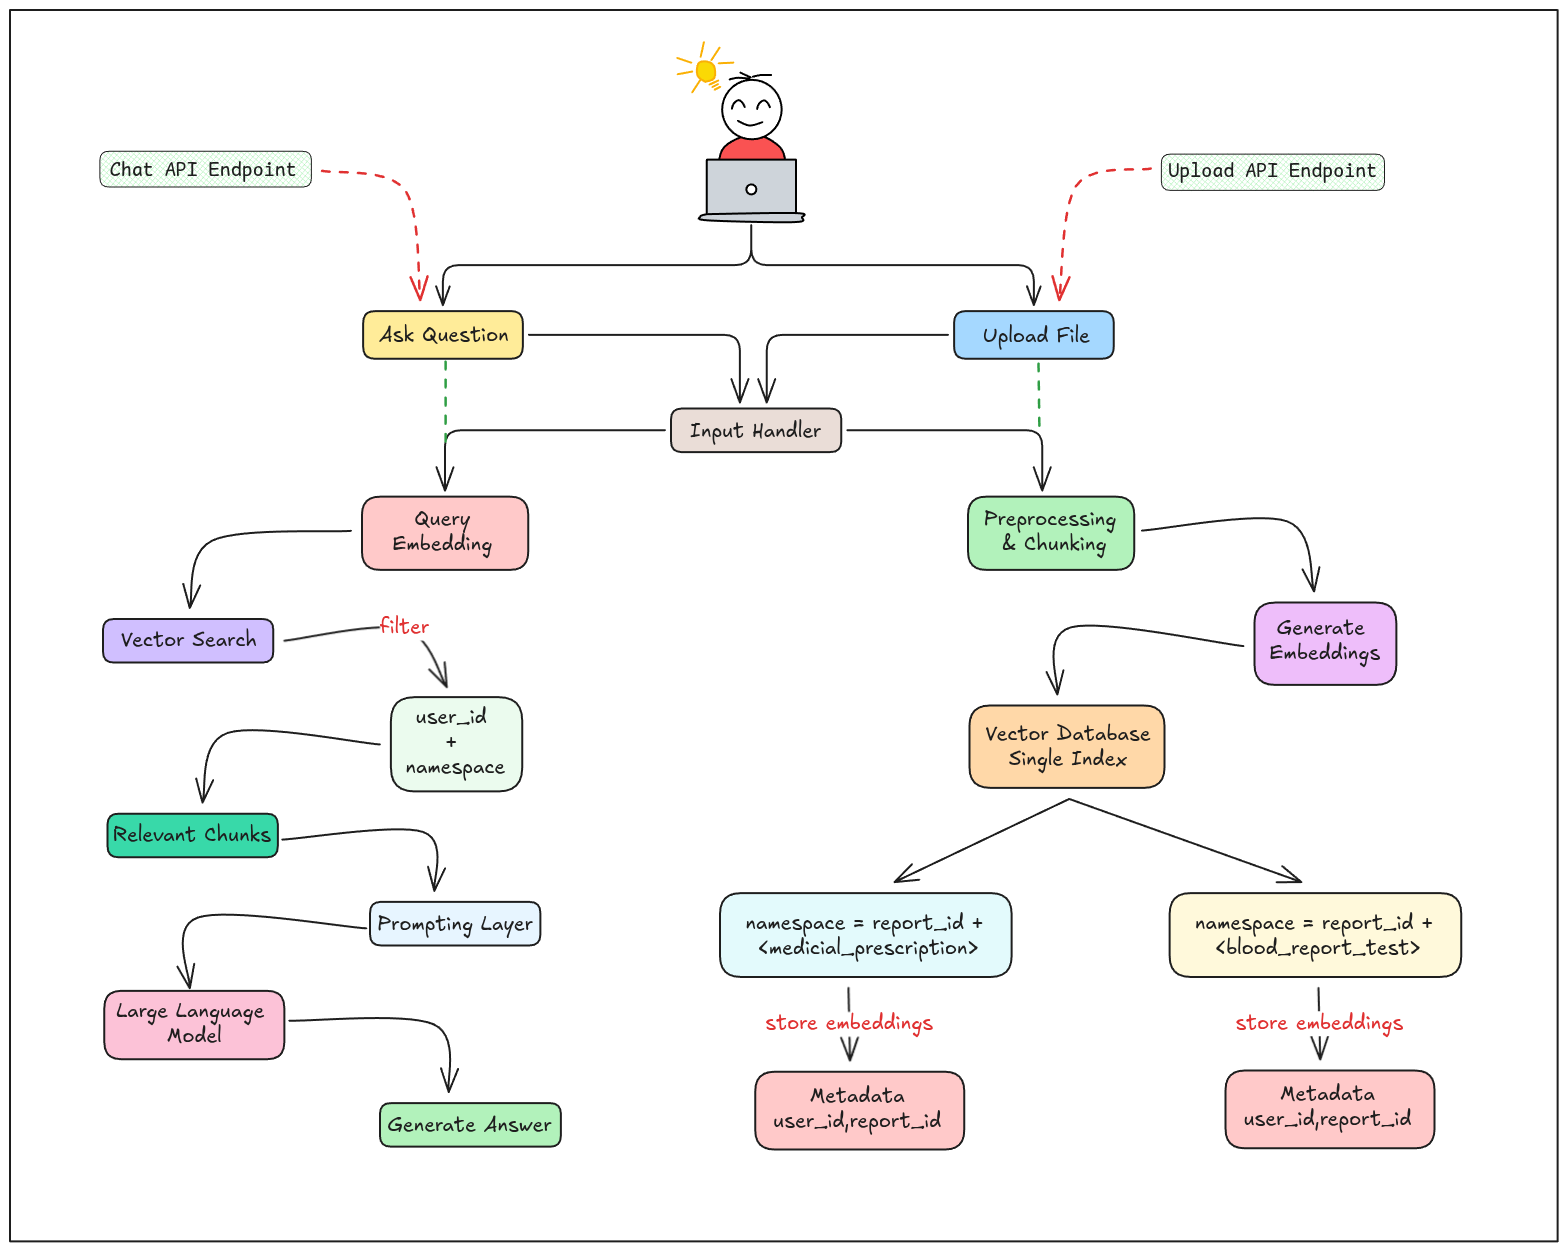
Wire-frame
The wire-frame covers all the key screens of the application, including the report upload page, medical summary view, doctor-like chat interface and a health trends dashboard to give users a complete end-to-end experience.
You can access wire-frame here: Wire-frame of the Website
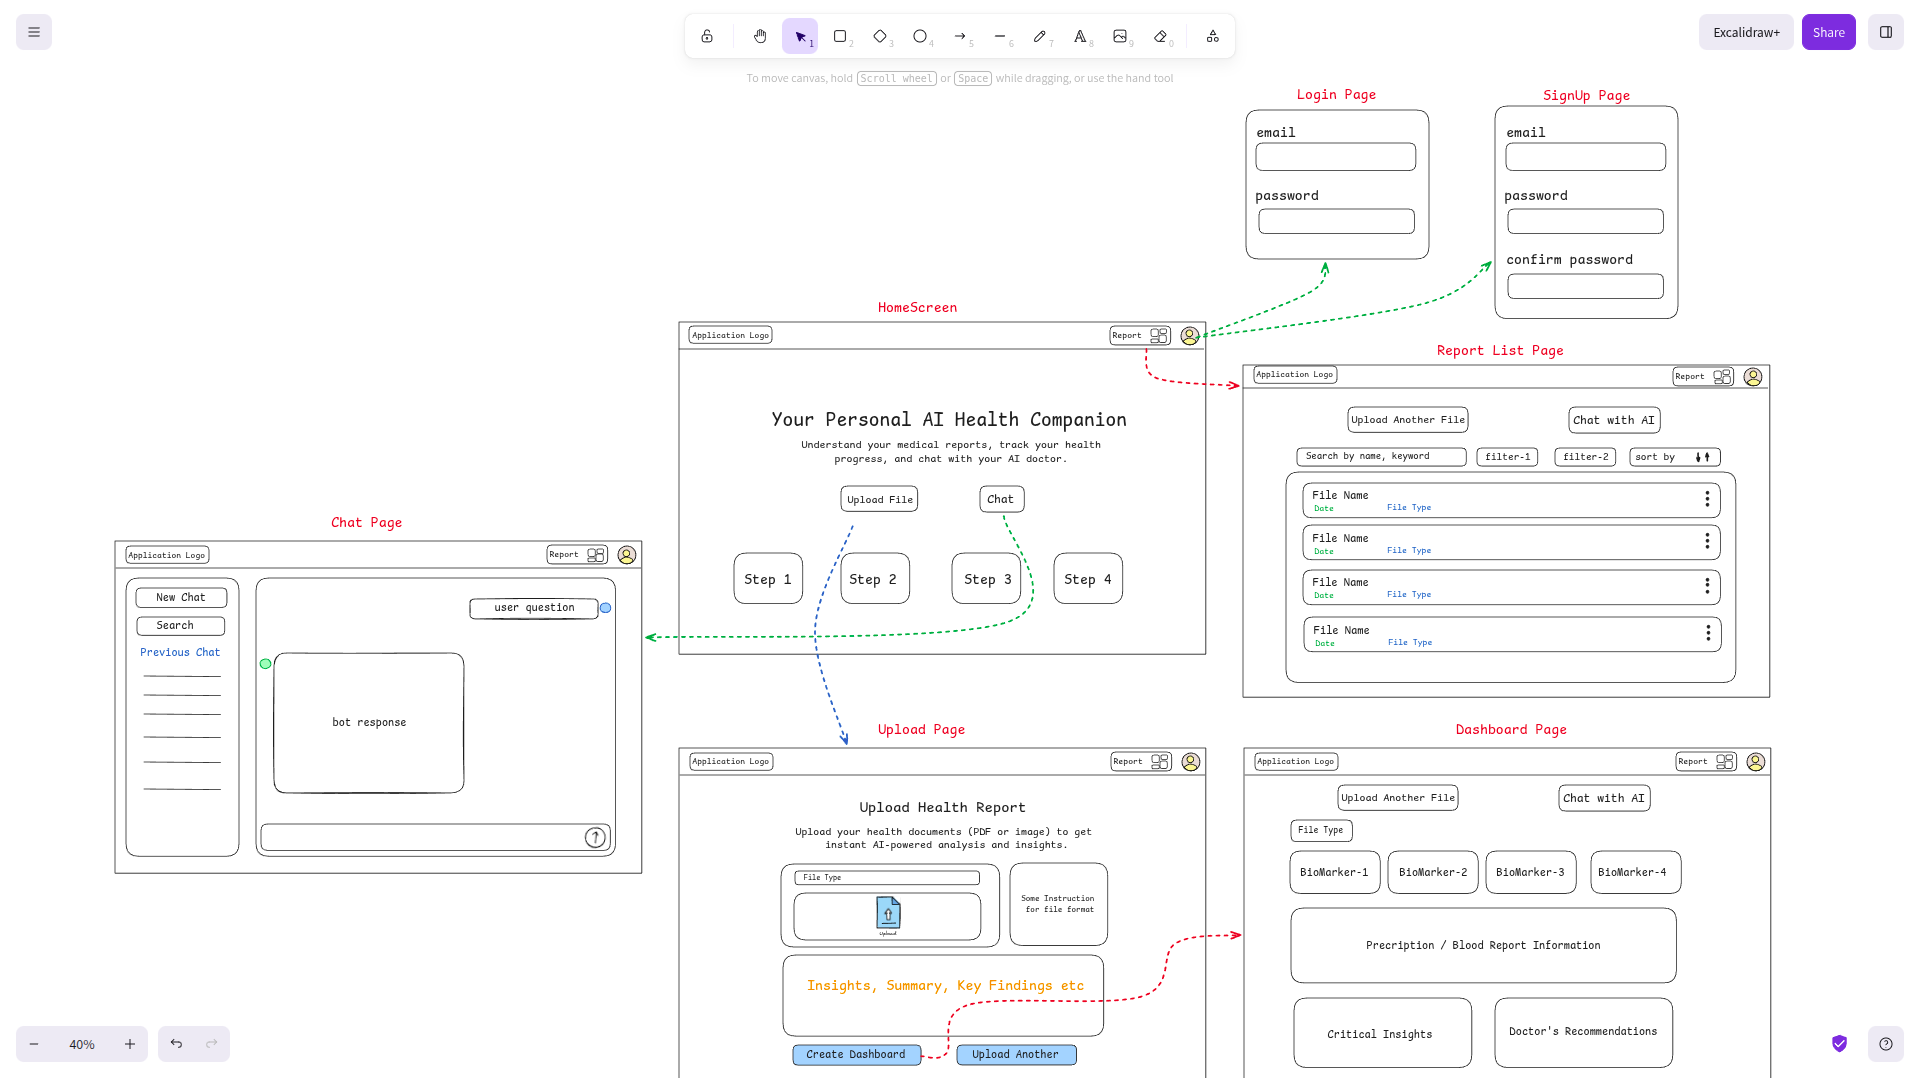
Flow Diagrams
Flow diagrams define how data moves through the system:
Upload → OCR → Parsing → Storage
Query → Retrieval → Augmentation → Generation
Chat → Context filtering → Safe response
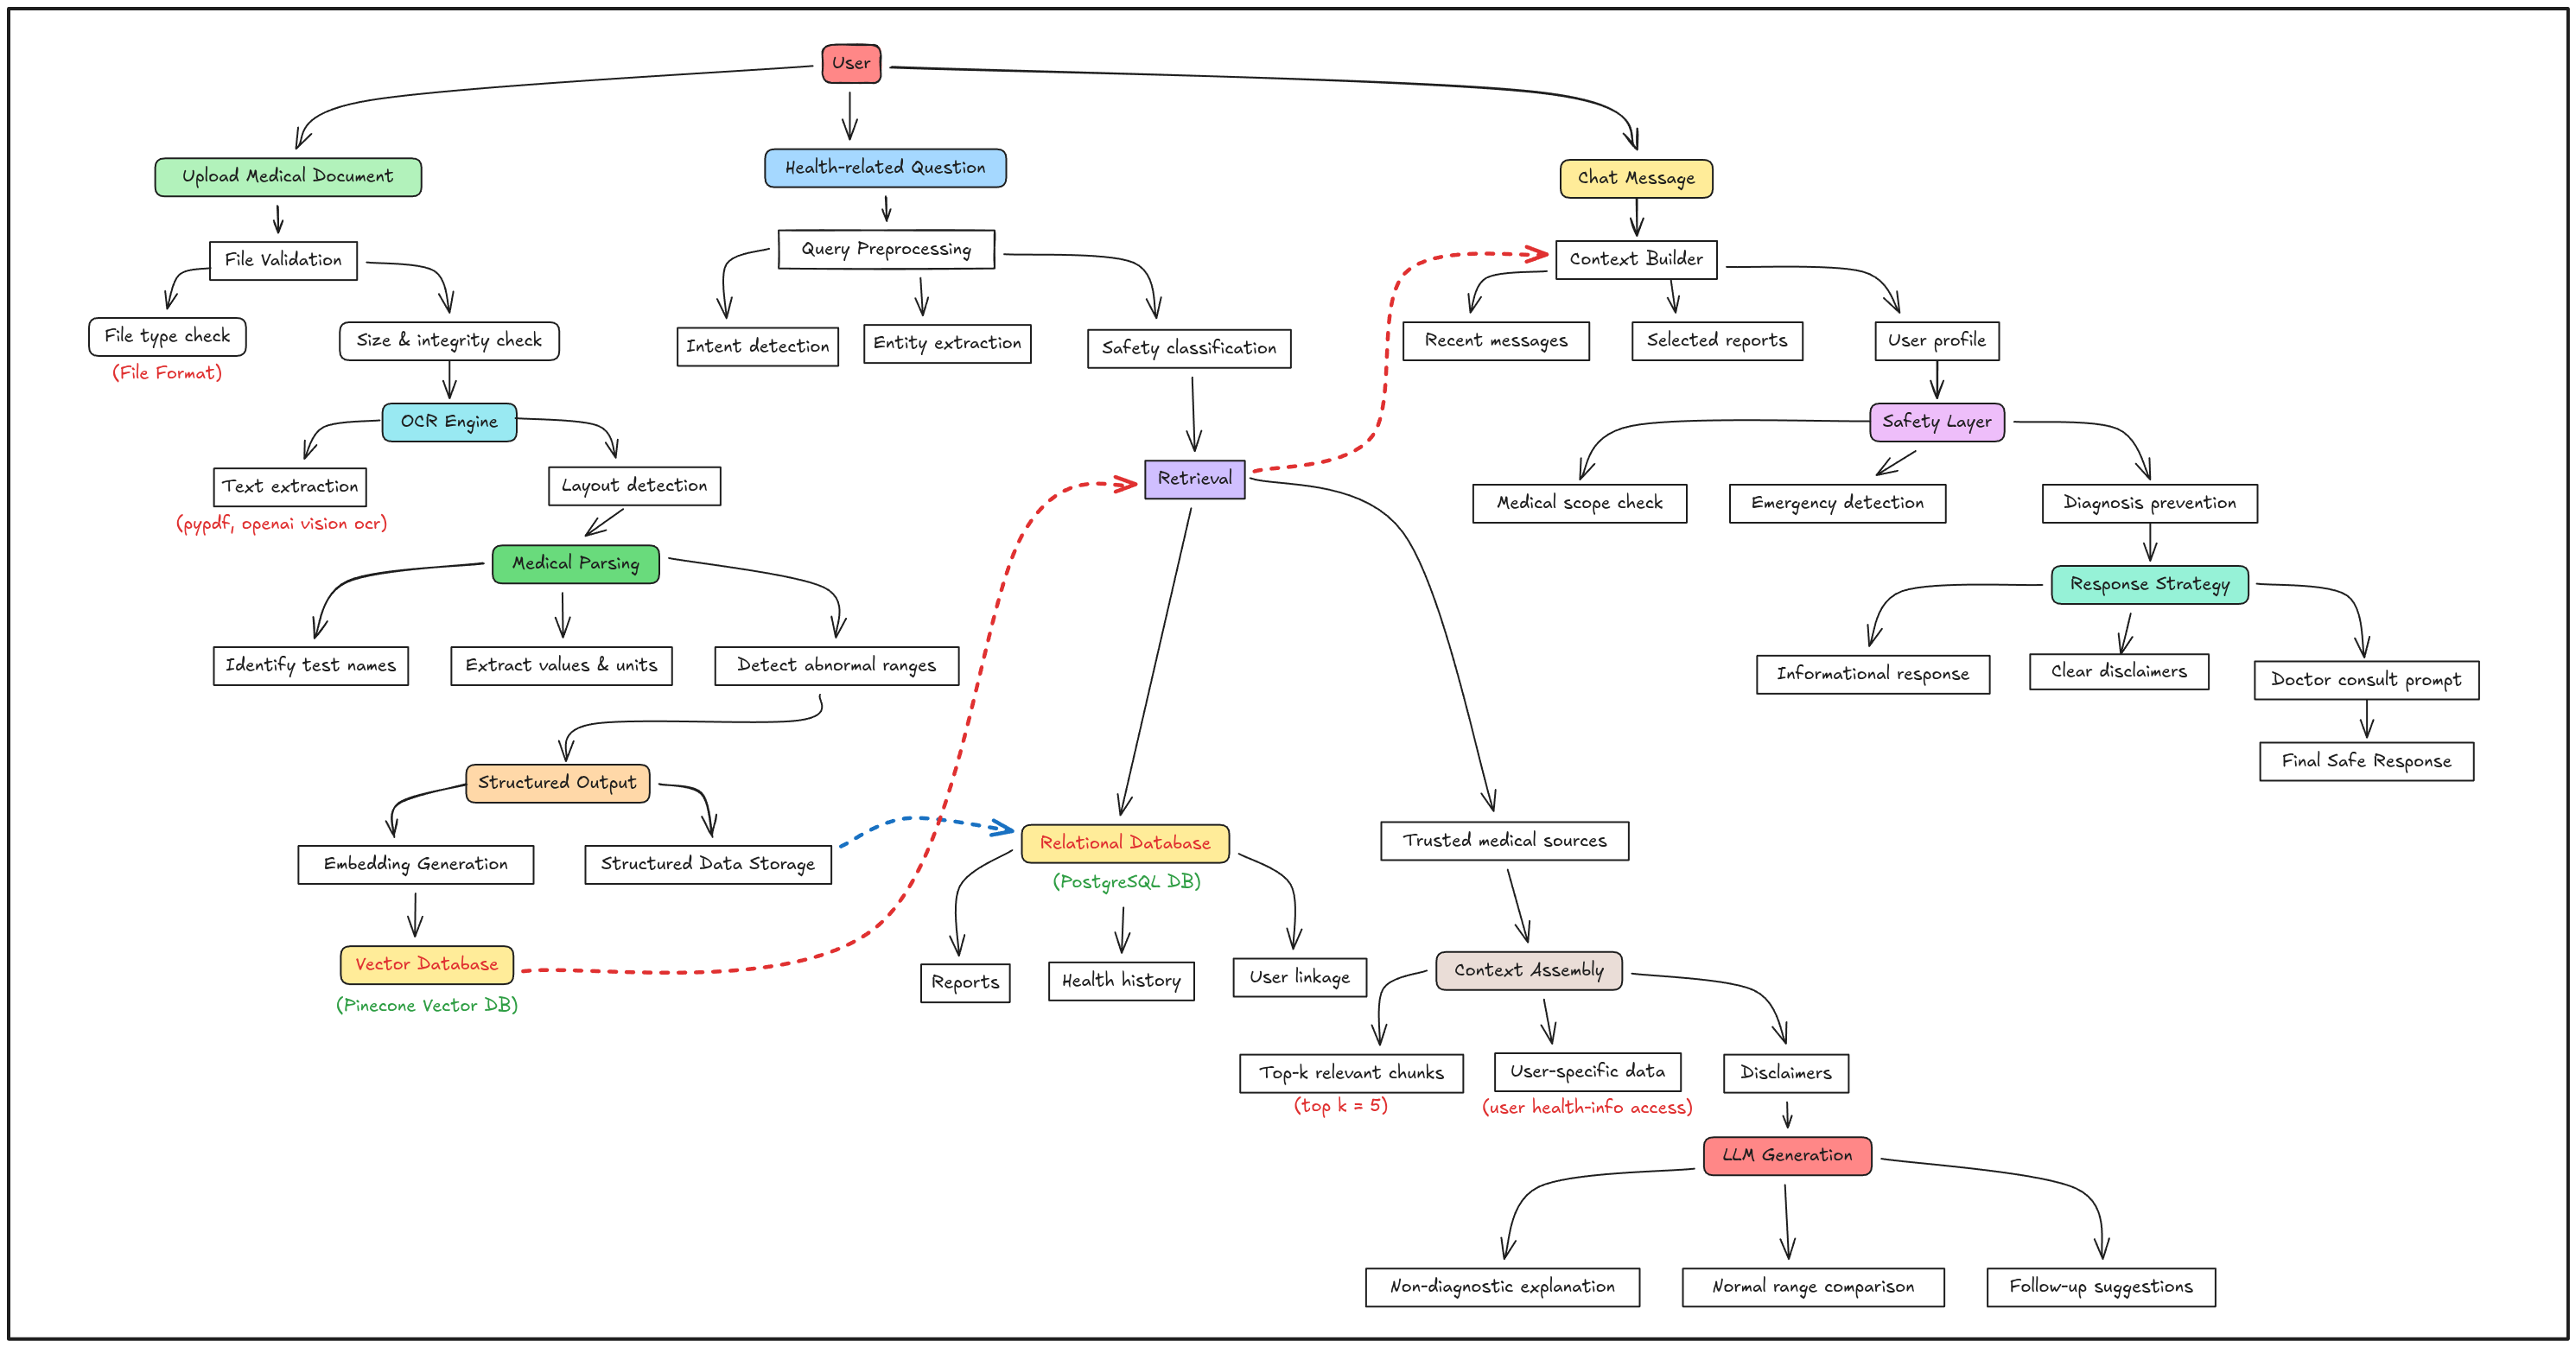
These diagrams serve as living documentation.
Non-Functional Requirements
| Category | Requirement |
| Observability | Full tracing |
| Cost | Predictable LLM usage |
Tech Stack Selection
| Layer | Technology | Reason |
| Frontend | Next.js | Fast iteration, SSR, SEO-friendly |
| Backend | FastAPI | Async, scalable, clean API design |
| Database | PostgreSQL | Reliable structured storage |
| Vector DB | Pinecone | Fast similarity search |
| RAG | Custom (Vanilla RAG) | Full control, no framework abstraction |
| LLM | GPT-4o-mini, GPT-3.5 | Cost-efficient, good reasoning |
| OCR | OpenAI Vision | Accurate document text extraction |
| Parsing | Custom Python logic | Domain-specific medical parsing |
Frontend UI Design
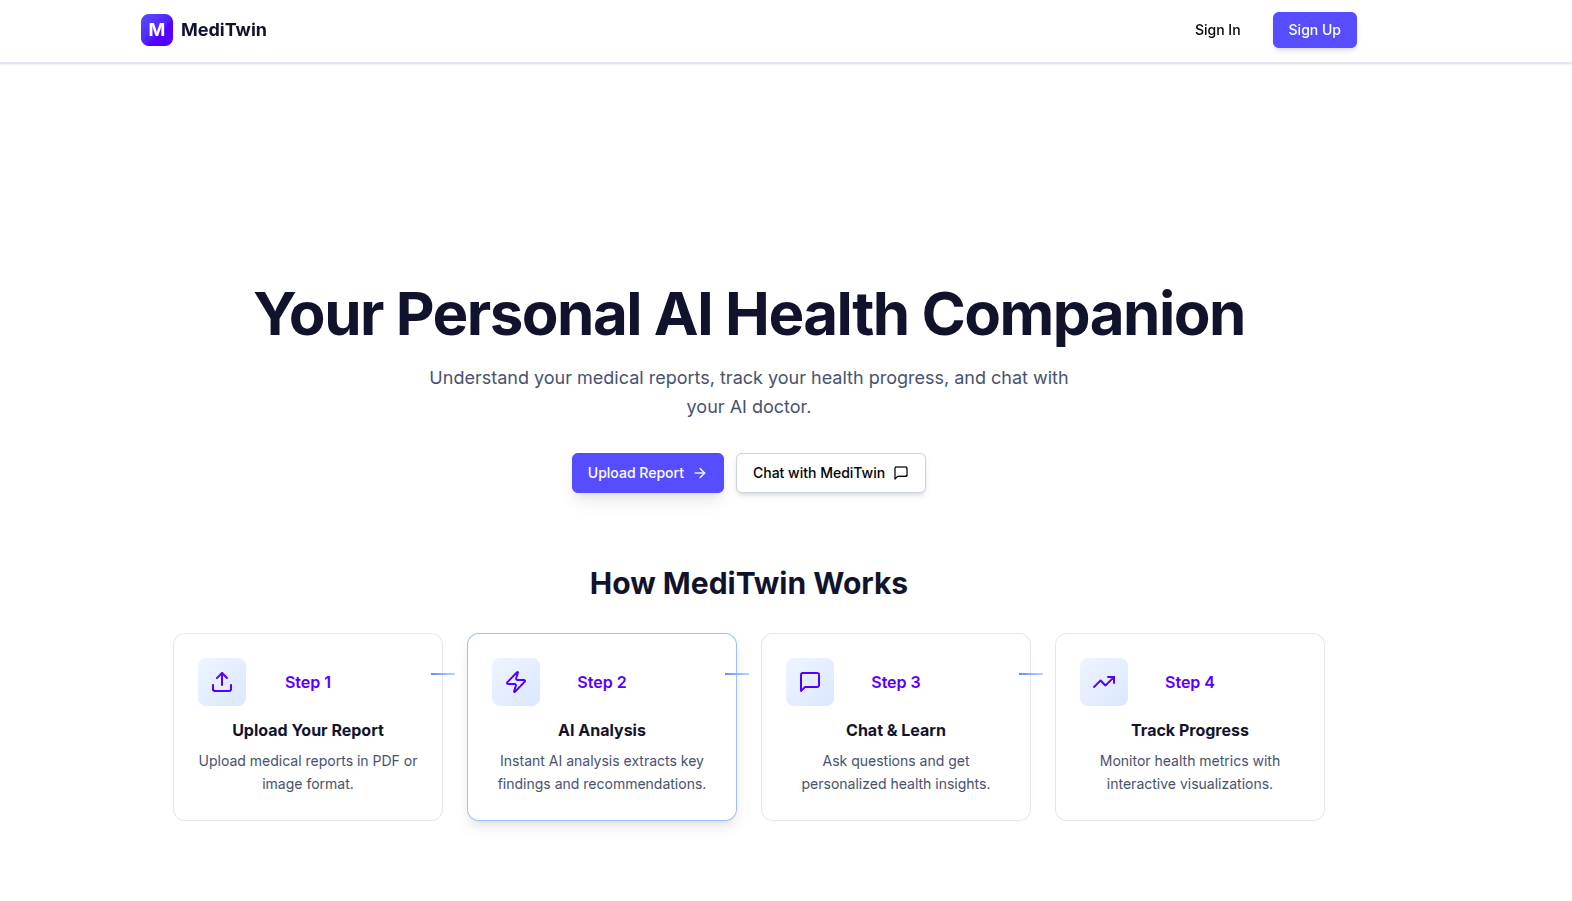
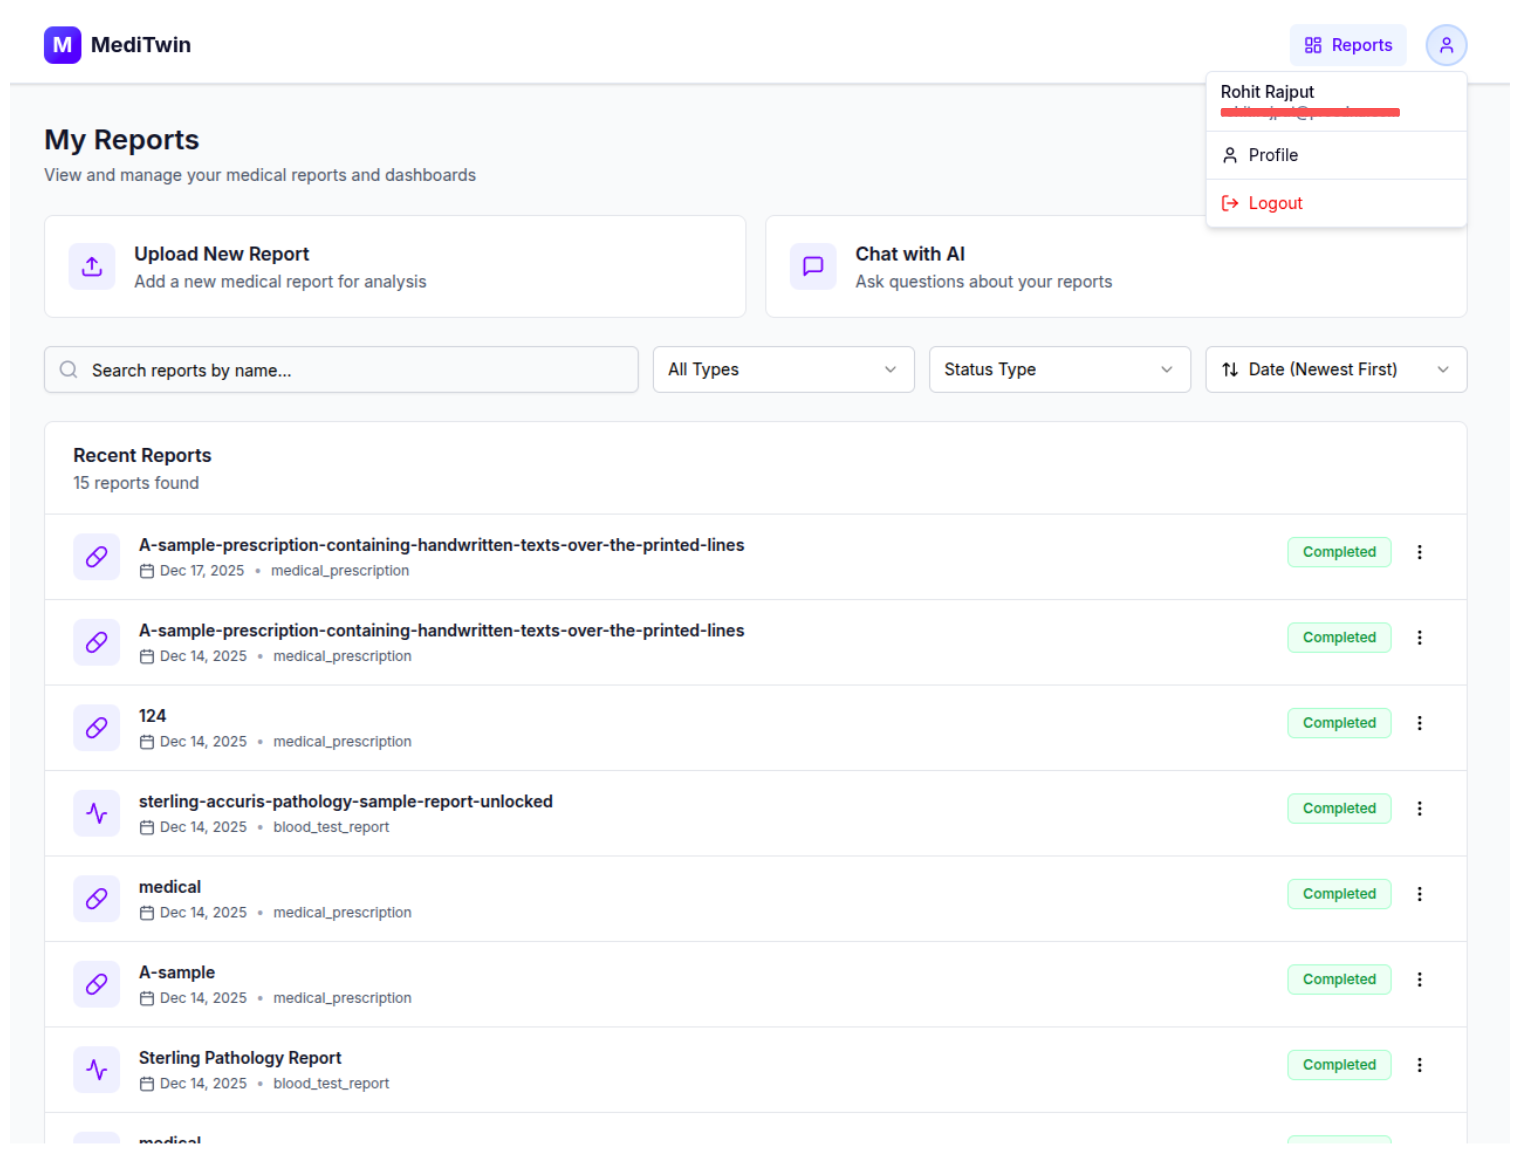
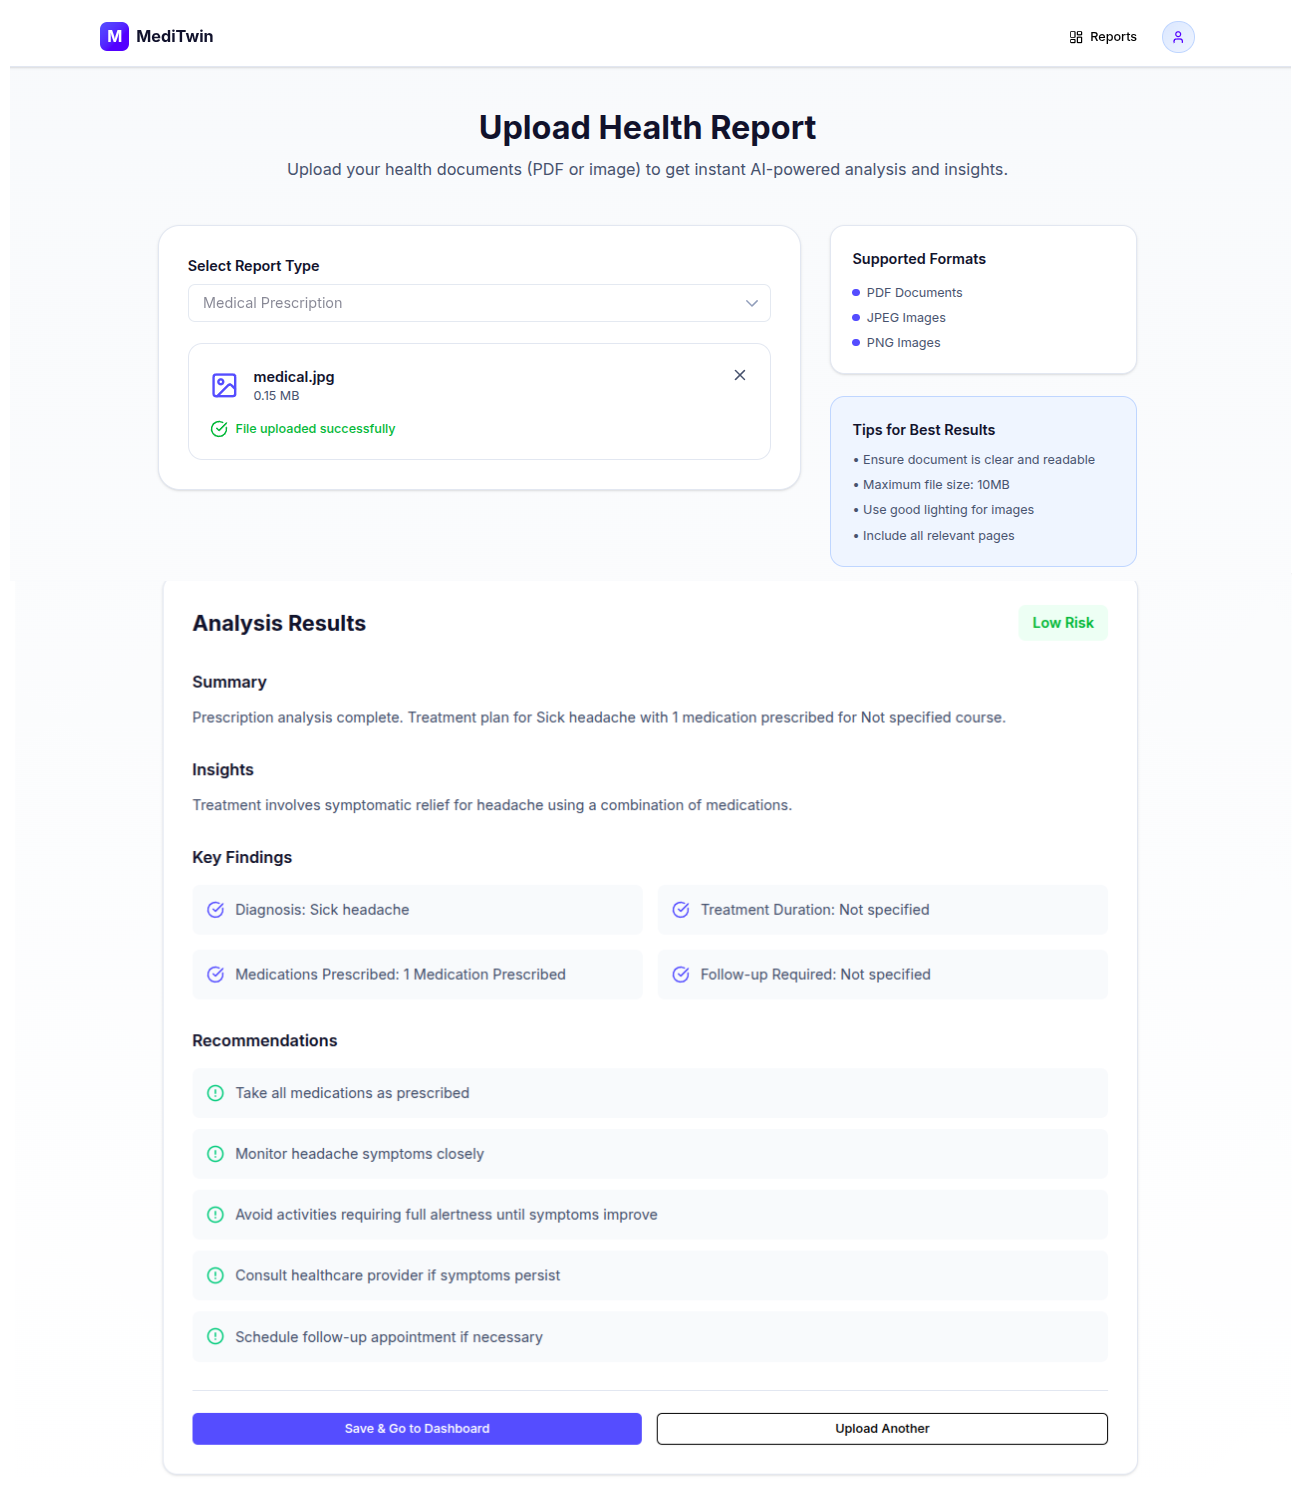
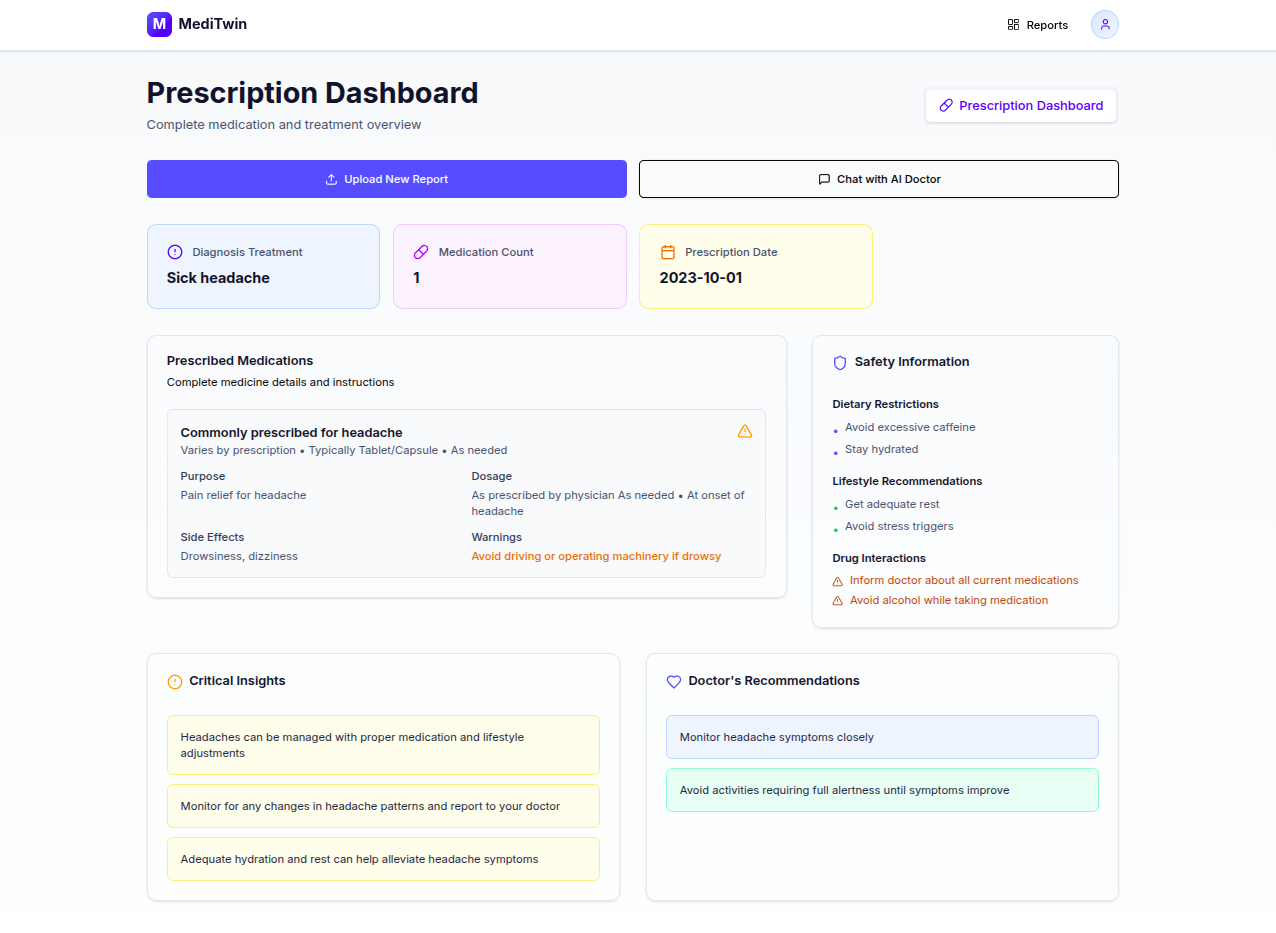
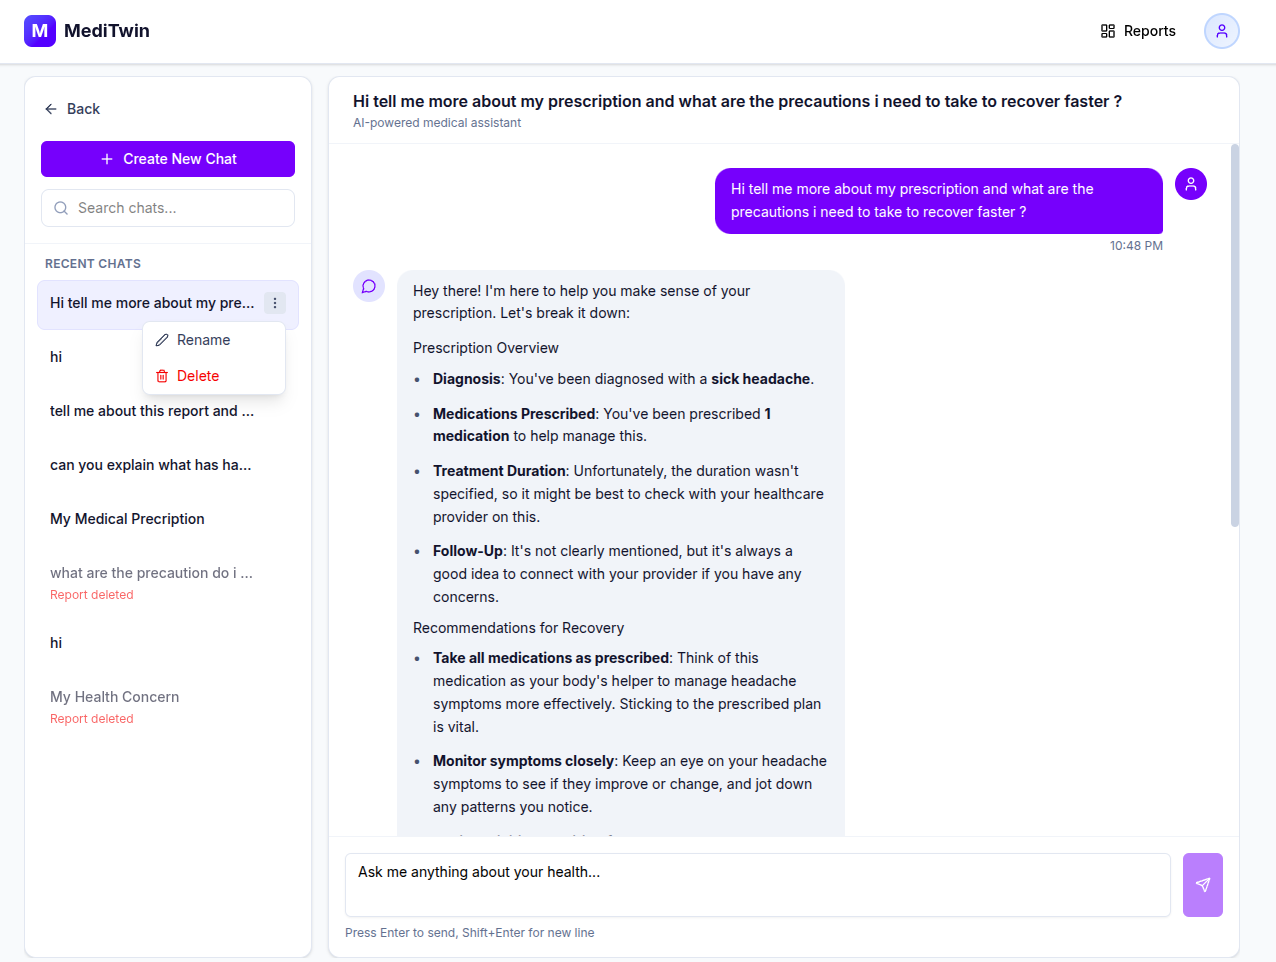
- The UI follows clear design principles: it uses simple language, highlights only important values, avoids alarming phrasing, and visualizes trends clearly, with the goal of reducing user anxiety rather than increasing it.
Home Screen
Report List Page
Upload Page
Dashboard Page (Note: More Detailed Prescription More Good Dashboard)
Chat Page
Database & Vector DB Design
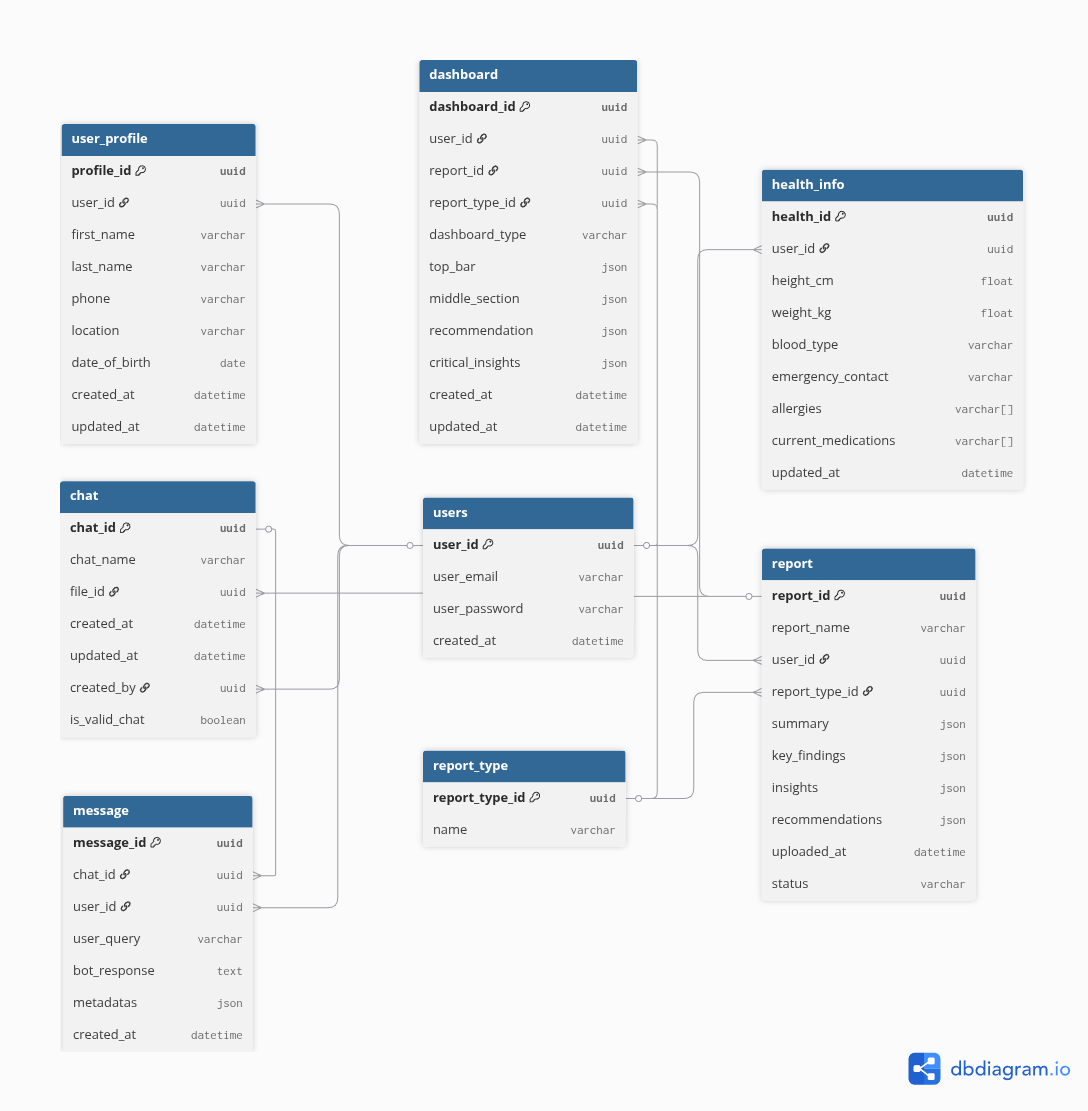
Relational Database (PostgreSQL)
Users
Medical reports
Prescriptions
Chat history
Connection with PostgreSQL using Async
Sets up an asynchronous connection to a PostgreSQL database using SQLAlchemy.
Loads DB credentials from environment/config and Creates an async engine for non-blocking DB operations.
Provides AsyncSessionLocal to use in async functions for database access.
from dotenv import load_dotenv
from sqlalchemy.ext.asyncio import create_async_engine, async_sessionmaker, AsyncSession
import config

# Load environment variables
load_dotenv()

# DB configuration
db_username = config.DB_USER_NAME
db_password = config.DB_PASSWORD
db_host = config.DB_HOST
db_port = config.DB_PORT
db_name = config.DB_NAME

# PostgreSQL database URL
database_url = f"postgresql+asyncpg://{db_username}:{db_password}@{db_host}:{db_port}/{db_name}"

# Create async engine (echo=True logs SQL queries)
engine = create_async_engine(database_url, echo=False)

# Async session maker
AsyncSessionLocal = async_sessionmaker(bind=engine, class_=AsyncSession, expire_on_commit=False)
Link to Database Design: MediTwin: Entity Relationship Diagram (ERD)
Vector Database
I used Pinecone to store embeddings of trusted medical knowledge so the system can quickly find the right context for a user’s question.
This helps the AI give clear, relevant, and source-based explanations instead of guessing.
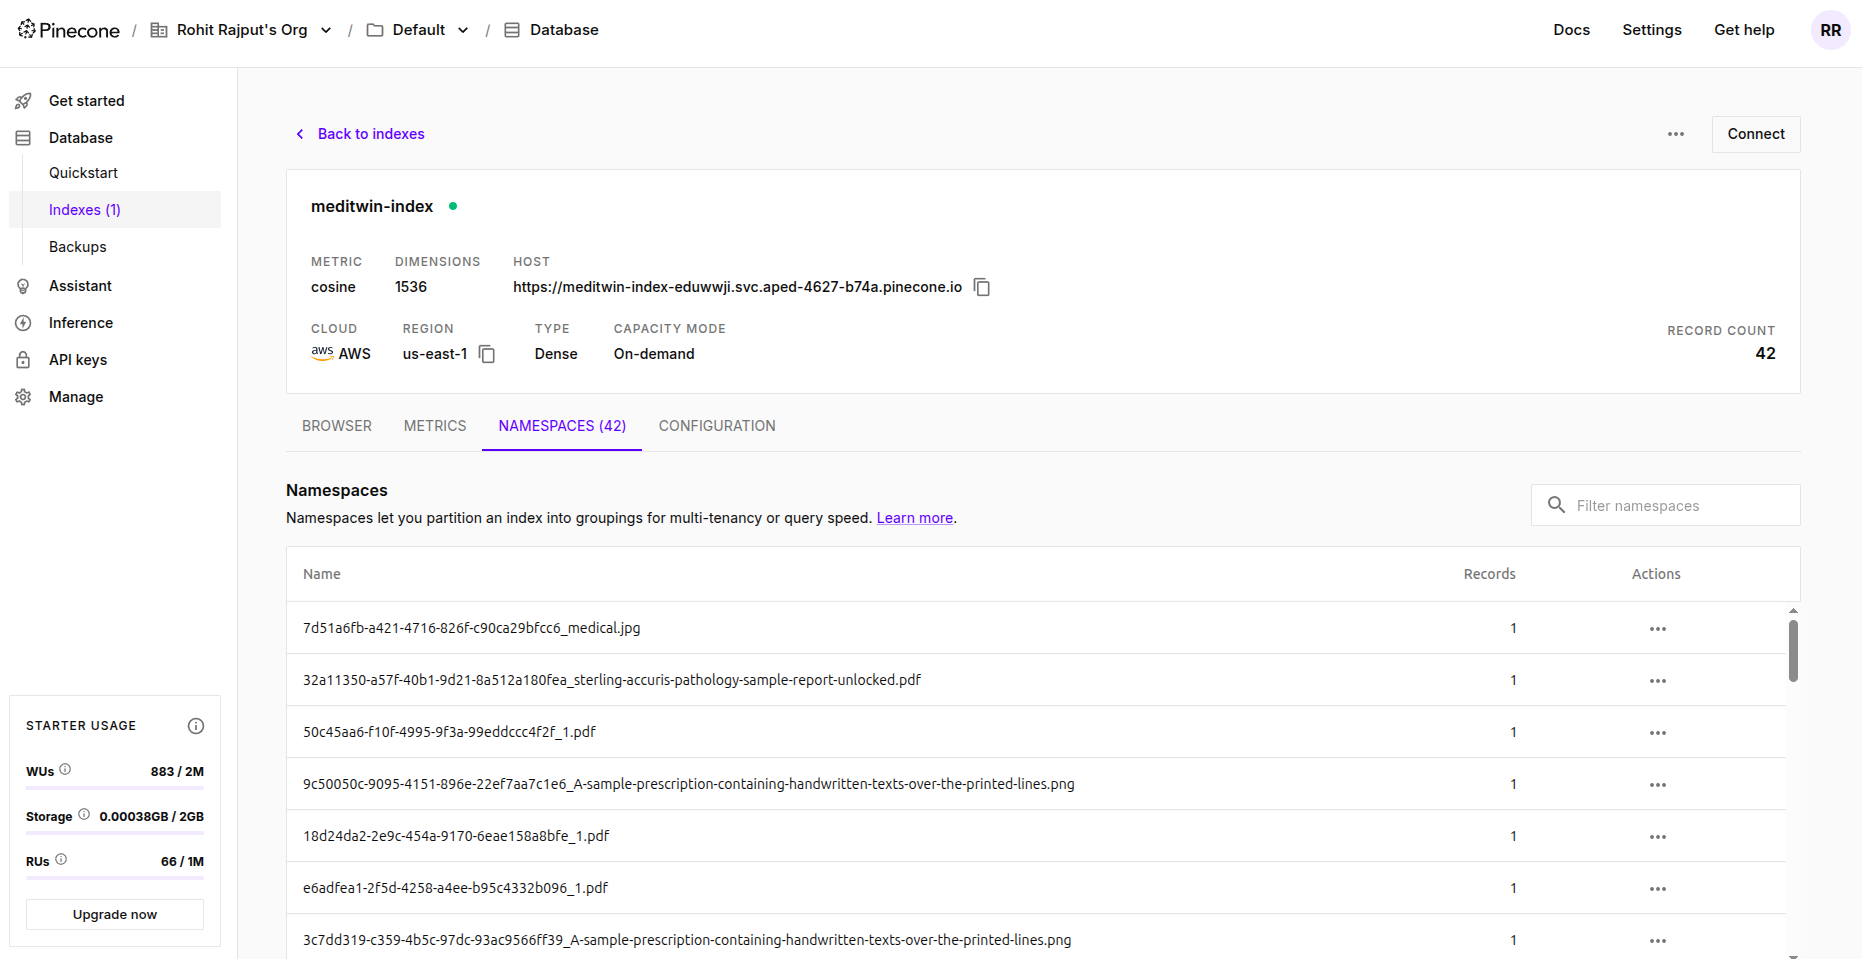
This separation improves performance and clarity.
API Design & Code Example
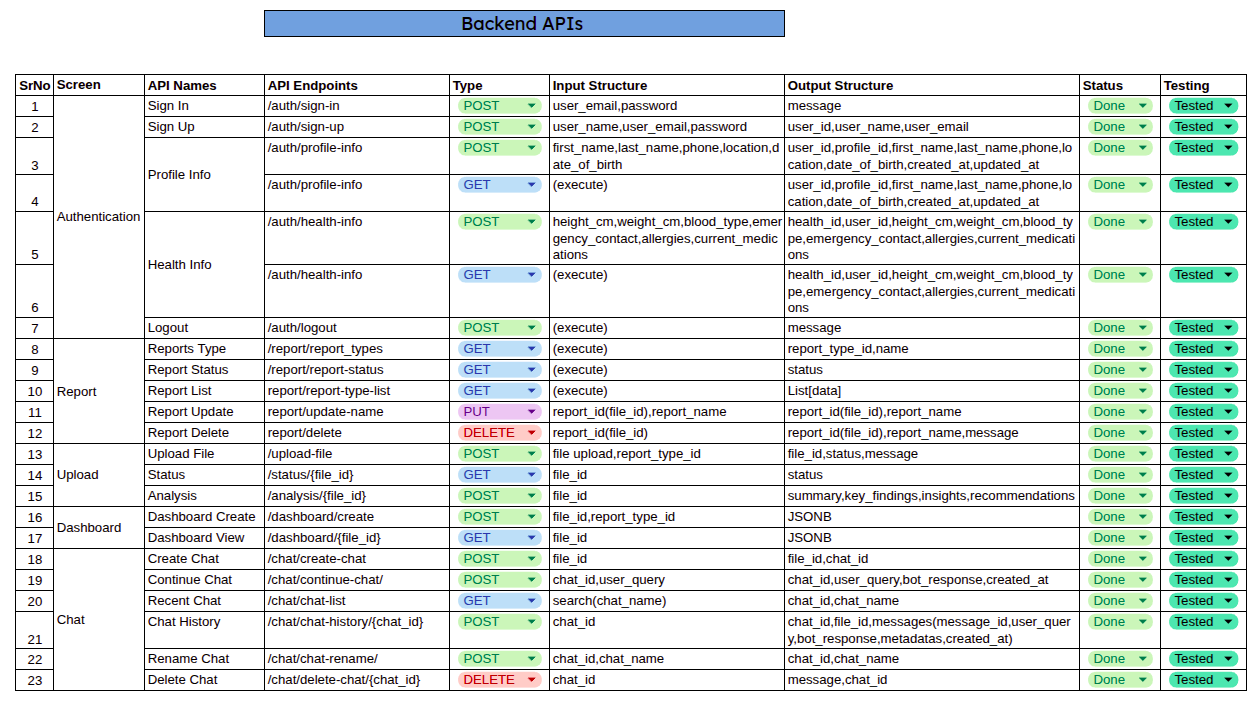
While designing the APIs, I started by thinking from a user journey perspective — what action is the user performing, and what response do they expect back?
- Each API maps to one clear responsibility, with well-defined inputs and outputs.
Key APIs include:
Report upload
Summary generation
Chat Interaction
Health insights Dashboard
APIs List Comprehension:
Excel Sheet Link: MediTwin Excel Workbook
How You Can Create an API Endpoint (For Example Upload API)
For every API, I asked :
What is the minimum data required to perform this action?
Can this input be validated easily?
Does it avoid sending unnecessary data?
process.py
async def process_upload(file: UploadFile, file_id=None, content: bytes = None):
    """
    Main pipeline:
    1. Extract text using OpenAI Vision
    2. Generate embedding
    3. Upload to Pinecone
    4. Update Postgres report status
    """
    try:
        if file_id is None:
            file_id = create_file_id()

        # Extract text
        text = await extract_text(file, content, is_medical=True)

        if not text or not text.strip():
            raise RuntimeError(
                f"No text could be extracted from '{file.filename}'. "
                f"Please ensure the file contains readable text."
            )

        text_length = len(text.strip())

        if text_length < MIN_TEXT_LENGTH:
            raise RuntimeError(
                f"Insufficient text content in '{file.filename}' "
                f"({text_length} characters, minimum {MIN_TEXT_LENGTH} required)"
            )

        # Generate embedding
        embedding = await generate_embedding(text)

        # Upload to Pinecone
        namespace = await upload_to_pinecone(file_id, file.filename, embedding, text)

        # Update database
        async with AsyncSessionLocal() as session:
            stmt = (
                update(Report)
                .where(Report.report_id == file_id)
                .values(
                    summary={"text_length": len(text), "preview": text[:500]},
                    insights={"namespace": namespace, "extraction_method": "vision_api"},
                    status="completed",
                    uploaded_at=datetime.now(timezone.utc)
                )
            )
            await session.execute(stmt)
            await session.commit()

        return file_id

    except Exception as e:
        error_msg = str(e)

        # Update database with error status
        try:
            async with AsyncSessionLocal() as session:
                await session.execute(
                    update(Report)
                    .where(Report.report_id == file_id)
                    .values(
                        status="failed",
                        insights={
                            "error": error_msg,
                            "error_type": type(e).__name__,
                            "timestamp": datetime.now(timezone.utc).isoformat()
                        }
                    )
                )
                await session.commit()
        except Exception:
            pass

        raise
schema.py
from pydantic import BaseModel
from typing import Any, Dict, List, Optional
from uuid import UUID

class FileUploadResponse(BaseModel):
    file_id: UUID
    report_name: str
    status: str
    message: str
manager.py
from fastapi import UploadFile, BackgroundTasks, HTTPException
from .process import process_upload
from sqlalchemy import select
from sqlalchemy.ext.asyncio import AsyncSession
from database.models.report import Report
from database.models.report_type import ReportType
from .dependency import pinecone_index
from .prompt import PROMPTS
import json
import re
from uuid import UUID
from datetime import datetime, timezone

async def file_upload(
    file: UploadFile,
    file_id: UUID,
    background=False,
    background_tasks: BackgroundTasks = None
):
    """Handles file upload + background processing."""
    try:
        if background and background_tasks:
            content = await file.read()
            await file.seek(0)
            background_tasks.add_task(process_upload, file, file_id, content)
            return file_id
        else:
            return await process_upload(file, file_id)
    except Exception as e:
        raise HTTPException(status_code=500, detail=f"File upload failed: {str(e)}")
views.py
import os
from fastapi import APIRouter, UploadFile, Form, File, Depends, HTTPException, Request, BackgroundTasks
from sqlalchemy.ext.asyncio import AsyncSession
from .dependency import limiter, get_report_type, allowed_file, openai_client
from .manager import file_upload, analyze_report
from .schema import FileUploadResponse, AnalysisResponse
from database.gets import get_db
from database.models.report import Report
from datetime import datetime, timezone
from src.auth.dependency import get_current_user
from sqlalchemy import insert, select
from uuid import uuid4

upload_router = APIRouter(tags=["Upload"])

@upload_router.post("/upload-file", response_model=FileUploadResponse)
@limiter.limit("5/minute")
async def upload_file(
    request: Request,
    background_tasks: BackgroundTasks,
    report_type_id: str = Form(...),
    report_file: UploadFile = File(...),
    db: AsyncSession = Depends(get_db),
    current_user=Depends(get_current_user)
):
    """
    Upload and process a medical document (prescription or blood report)
    """
    try:
        # Validate report type
        await get_report_type(db, report_type_id)

        # Validate file type
        if not allowed_file(report_file.filename):
            raise HTTPException(
                status_code=400,
                detail="Invalid file type. Allowed: PDF, JPEG, JPG, PNG"
            )

        # Generate file UUID
        file_id = uuid4()

        # Extract report name (filename without extension)
        report_name = os.path.splitext(report_file.filename)[0]

        # Insert into Report table
        stmt = insert(Report).values(
            report_id=file_id,
            user_id=current_user.user_id,
            report_type_id=report_type_id,
            report_name=report_name,
            status="processing",
            uploaded_at=datetime.now(timezone.utc)
        )

        await db.execute(stmt)
        await db.commit()

        # Background processing
        await file_upload(
            report_file,
            file_id=file_id,
            background=True,
            background_tasks=background_tasks
        )

        return FileUploadResponse(
            file_id=file_id,
            report_name=report_name,
            status="processing",
            message=f"File '{report_file.filename}' uploaded successfully. Processing in background.",
        )

    except HTTPException:
        raise
    except Exception as e:
        await db.rollback()
        raise HTTPException(status_code=500, detail=f"Upload failed: {str(e)}")
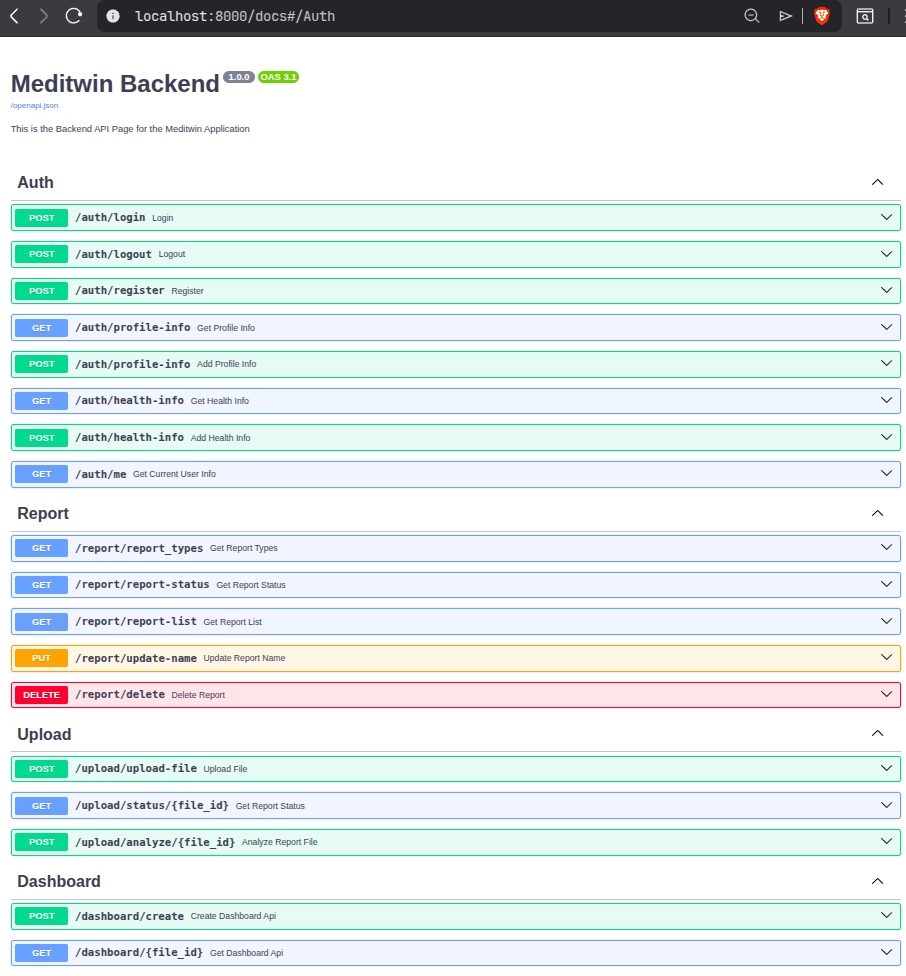
Test APIs on Swagger UI
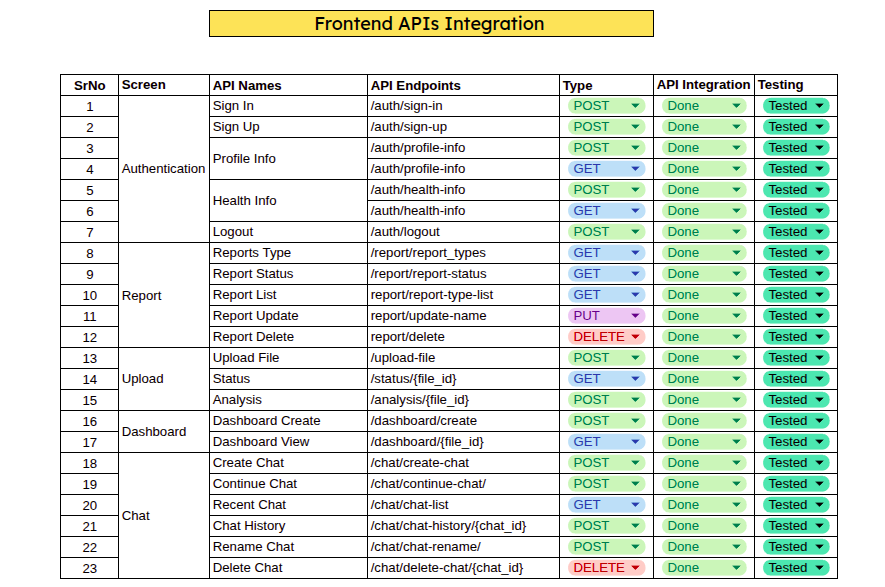
API Integration → Frontend
- On the frontend, backend APIs are integrated using async calls, so the UI never feels blocked while data is being processed.
How can you Integrate Backend API to Frontend (For Example Login API)
login/route.ts
import { type NextRequest, NextResponse } from "next/server"

export async function POST(request: NextRequest) {
  try {
    const { email, password } = await request.json()

    if (!email || !password) {
      return NextResponse.json(
        { error: "Email and password are required" },
        { status: 400 }
      )
    }

    console.log("Attempting login for:", email)

    const backendResponse = await fetch(
      `${process.env.NEXT_PUBLIC_API_URL}/auth/login`,
      {
        method: "POST",
        headers: {
          "Content-Type": "application/json",
        },
        body: JSON.stringify({
          user_email: email,
          password: password,
        }),
      }
    )

    const data = await backendResponse.json()

    if (!backendResponse.ok) {
      console.log("Login failed:", data)
      return NextResponse.json(
        { error: data.detail || "Invalid credentials" },
        { status: backendResponse.status }
      )
    }

    console.log("Login successful, setting cookie")

    const response = NextResponse.json(data, { status: 200 })

    // Store access token in HTTP-only cookie
    if (data.access_token) {
      response.cookies.set({
        name: "access_token",
        value: data.access_token,
        httpOnly: true,
        secure: process.env.NODE_ENV === "production",
        sameSite: "lax",
        maxAge: 60 * 60 * 24 * 7, // 7 days
        path: "/",
      })
      console.log("Access token cookie set")
    }

    return response
  } catch (error) {
    console.error("Login error:", error)
    return NextResponse.json(
      { error: "Internal server error" },
      { status: 500 }
    )
  }
}
login/page.tsx
"use client"
import { useState } from "react"
import Link from "next/link"
import { useRouter } from "next/navigation"
import AuthForm from "@/components/auth-form"
import { useToast } from "@/hooks/use-toast"

const API_BASE_URL = process.env.NEXT_PUBLIC_API_BASE_URL || 'http://localhost:8000'

export default function LoginPage() {
  const router = useRouter()
  const { toast } = useToast()
  const [isLoading, setIsLoading] = useState(false)

  const handleLogin = async (data: { email: string; password: string }) => {
    setIsLoading(true)
    try {
      const res = await fetch(`${API_BASE_URL}/auth/login`, {
        method: "POST",
        headers: { "Content-Type": "application/json" },
        credentials: 'include',
        body: JSON.stringify({
          user_email: data.email,
          password: data.password,
        }),
      })

      if (!res.ok) {
        const err = await res.json()
        throw new Error(err.detail || "Login failed")
      }

      // Get user info
      const meRes = await fetch(`${API_BASE_URL}/auth/me`, { credentials: 'include' })
      const userData = meRes.ok ? await meRes.json() : { email: data.email }

      localStorage.setItem("user", JSON.stringify(userData))
      window.dispatchEvent(new Event("userChanged"))

      toast({ title: "Success", description: "Welcome back!" })
      router.push("/")
    } catch (error: any) {
      toast({ title: "Error", description: error.message, variant: "destructive" })
    } finally {
      setIsLoading(false)
    }
  }

  return (
    <div className="min-h-screen bg-gradient-to-b from-slate-50 via-white to-slate-50 flex items-center justify-center px-4">
      <div className="w-full max-w-md">
        <div className="text-center mb-10">
          <Link href="/" className="inline-flex items-center gap-2 mb-8">
            <div className="w-12 h-12 bg-gradient-to-br from-blue-500 to-blue-600 rounded-lg flex items-center justify-center">
              <span className="text-white font-bold text-2xl">M</span>
            </div>
            <span className="font-bold text-2xl">MediTwin</span>
          </Link>
          <h1 className="text-3xl font-bold">Welcome Back</h1>
          <p className="text-slate-600">Sign in to your account</p>
        </div>

        <div className="bg-white rounded-2xl border border-slate-200 p-8 shadow-lg">
          <AuthForm type="login" onSubmit={handleLogin} isLoading={isLoading} />
        </div>
      </div>
    </div>
  )
}
components/auth-form.tsx
"use client"

import type React from "react"
import { useState } from "react"
import Link from "next/link"
import { Button } from "@/components/ui/button"
import { Input } from "@/components/ui/input"
import { Eye, EyeOff } from "lucide-react"

export interface AuthFormData {
  email: string
  password: string
  confirmPassword?: string
}

interface AuthFormProps {
  type: "login" | "signup"
  onSubmit: (data: AuthFormData) => void | Promise<void>
  isLoading?: boolean
}

export default function AuthForm({ type, onSubmit, isLoading = false }: AuthFormProps) {
  const [email, setEmail] = useState("")
  const [password, setPassword] = useState("")
  const [confirmPassword, setConfirmPassword] = useState("")
  const [showPassword, setShowPassword] = useState(false)
  const [showConfirmPassword, setShowConfirmPassword] = useState(false)
  const [errors, setErrors] = useState<Record<string, string>>({})

  const validateForm = () => {
    const newErrors: Record<string, string> = {}

    if (!email) newErrors.email = "Email is required"
    else if (!/^[^\s@]+@[^\s@]+\.[^\s@]+$/.test(email)) newErrors.email = "Please enter a valid email"

    if (!password) newErrors.password = "Password is required"
    else if (password.length < 8) newErrors.password = "Password must be at least 8 characters"

    if (type === "signup") {
      if (!confirmPassword) newErrors.confirmPassword = "Please confirm your password"
      else if (password !== confirmPassword) newErrors.confirmPassword = "Passwords do not match"
    }

    setErrors(newErrors)
    return Object.keys(newErrors).length === 0
  }

  const handleSubmit = (e: React.FormEvent) => {
    e.preventDefault()
    if (validateForm()) {
      onSubmit({
        email,
        password,
        ...(type === "signup" && { confirmPassword }),
      })
    }
  }

  return (
    <form onSubmit={handleSubmit} className="space-y-6">
      {/* Email */}
      <div className="space-y-2">
        <label htmlFor="email" className="block text-sm font-medium text-slate-900">
          Email Address
        </label>
        <Input
          id="email"
          type="email"
          placeholder="you@example.com"
          value={email}
          onChange={(e) => {
            setEmail(e.target.value)
            if (errors.email) setErrors({ ...errors, email: "" })
          }}
          className={errors.email ? "border-red-500" : ""}
          disabled={isLoading}
          required
        />
        {errors.email && <p className="text-sm text-red-500">{errors.email}</p>}
      </div>

      {/* Password */}
      <div className="space-y-2">
        <label htmlFor="password" className="block text-sm font-medium text-slate-900">
          Password
        </label>
        <div className="relative">
          <Input
            id="password"
            type={showPassword ? "text" : "password"}
            placeholder="••••••••"
            value={password}
            onChange={(e) => {
              setPassword(e.target.value)
              if (errors.password) setErrors({ ...errors, password: "" })
            }}
            className={errors.password ? "border-red-500 pr-10" : "pr-10"}
            disabled={isLoading}
            required
          />
          <button
            type="button"
            onClick={() => setShowPassword(!showPassword)}
            className="absolute right-3 top-1/2 -translate-y-1/2 text-slate-600 hover:text-slate-900"
            disabled={isLoading}
          >
            {showPassword ? <EyeOff size={18} /> : <Eye size={18} />}
          </button>
        </div>
        {errors.password && <p className="text-sm text-red-500">{errors.password}</p>}
      </div>

      {/* Confirm Password */}
      {type === "signup" && (
        <div className="space-y-2">
          <label htmlFor="confirmPassword" className="block text-sm font-medium text-slate-900">
            Confirm Password
          </label>
          <div className="relative">
            <Input
              id="confirmPassword"
              type={showConfirmPassword ? "text" : "password"}
              placeholder="••••••••"
              value={confirmPassword}
              onChange={(e) => {
                setConfirmPassword(e.target.value)
                if (errors.confirmPassword) setErrors({ ...errors, confirmPassword: "" })
              }}
              className={errors.confirmPassword ? "border-red-500 pr-10" : "pr-10"}
              disabled={isLoading}
              required
            />
            <button
              type="button"
              onClick={() => setShowConfirmPassword(!showConfirmPassword)}
              className="absolute right-3 top-1/2 -translate-y-1/2 text-slate-600 hover:text-slate-900"
              disabled={isLoading}
            >
              {showConfirmPassword ? <EyeOff size={18} /> : <Eye size={18} />}
            </button>
          </div>
          {errors.confirmPassword && <p className="text-sm text-red-500">{errors.confirmPassword}</p>}
        </div>
      )}

      <Button
        type="submit"
        className="w-full bg-blue-500 hover:bg-blue-600 text-white font-medium py-2"
        disabled={isLoading}
      >
        {isLoading ? "Loading..." : type === "login" ? "Sign In" : "Create Account"}
      </Button>

      <div className="text-center text-sm text-slate-600">
        {type === "login" ? (
          <>
            Don't have an account?{" "}
            <Link href="/signup" className="text-blue-500 hover:underline font-medium">
              Sign up
            </Link>
          </>
        ) : (
          <>
            Already have an account?{" "}
            <Link href="/login" className="text-blue-500 hover:underline font-medium">
              Sign in
            </Link>
          </>
        )}
      </div>
    </form>
  )
}
Monitoring & Error Handling
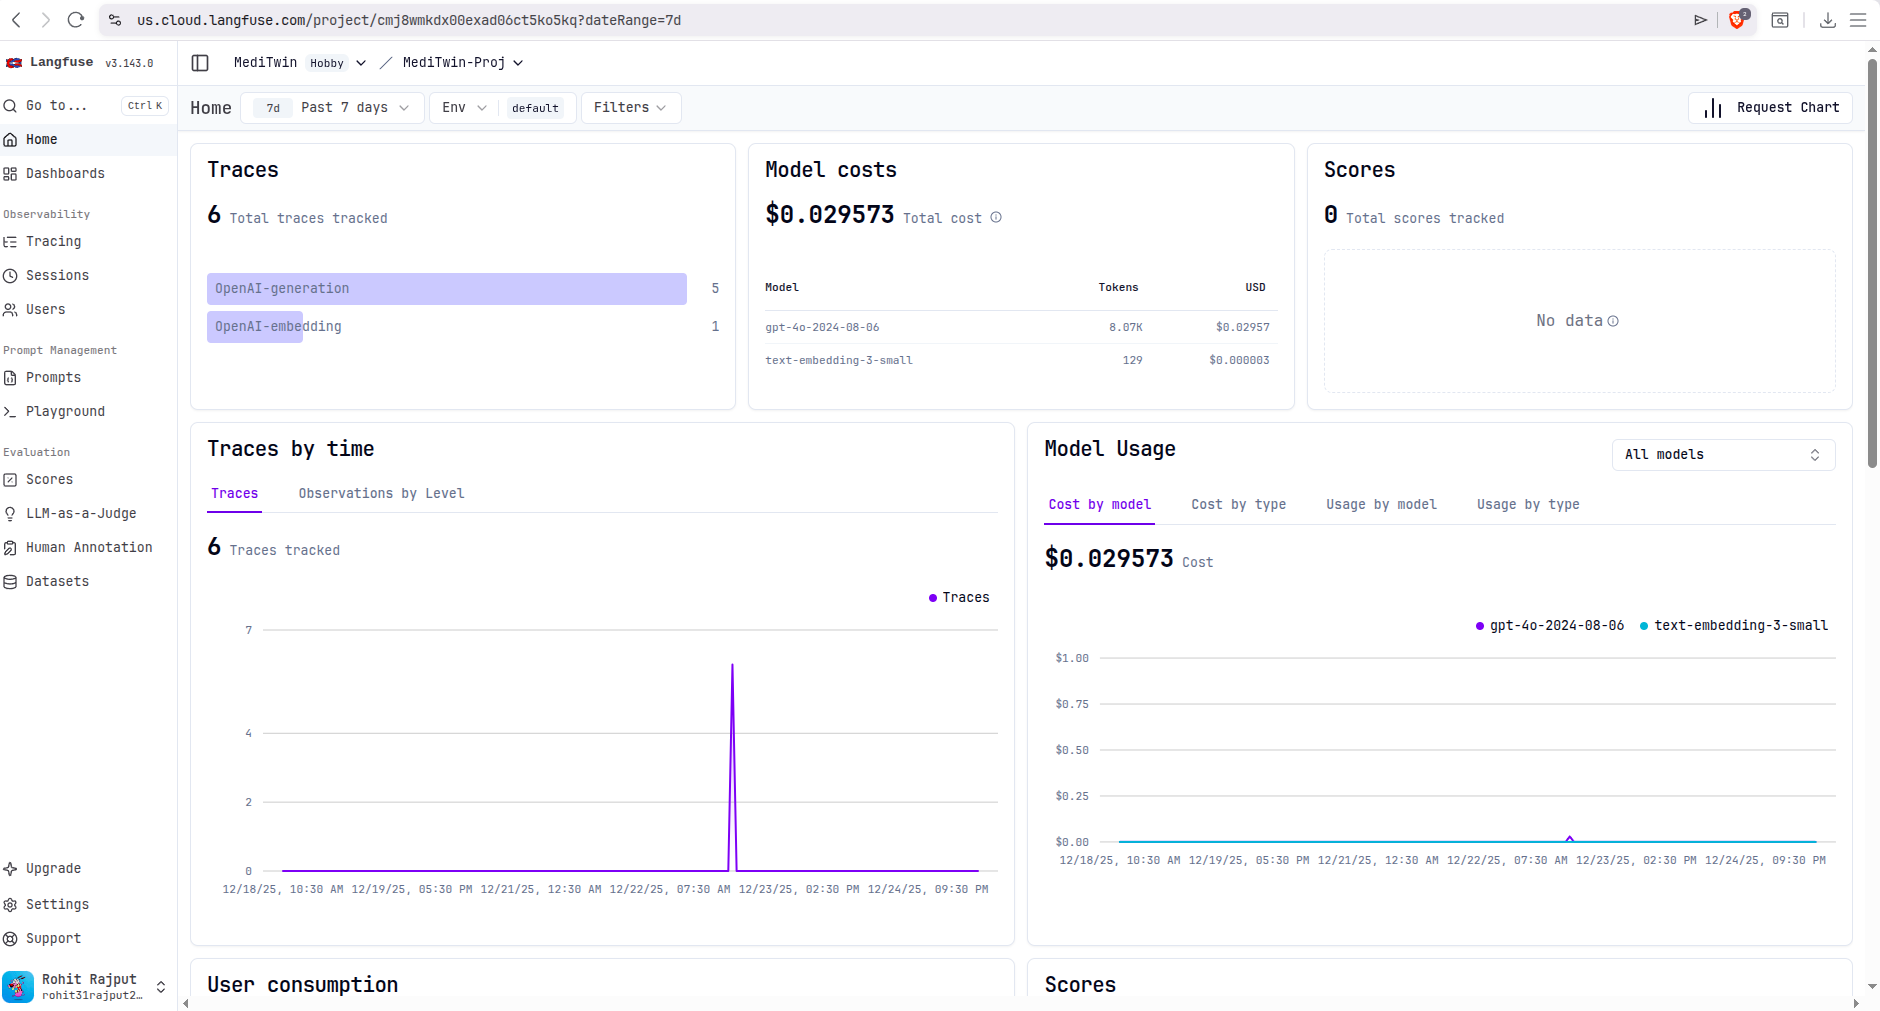
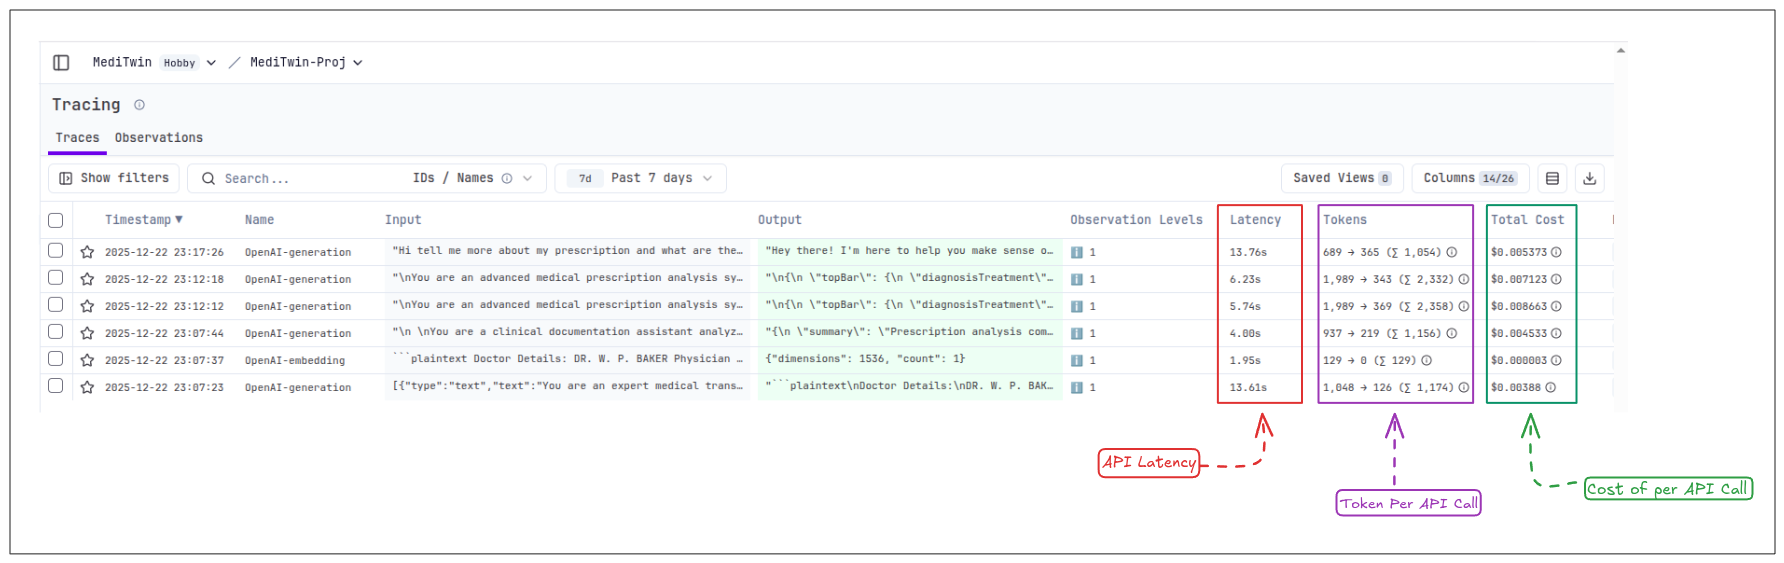
Monitoring & Cost Calculation (Langfuse Integration)
- Monitoring and cost calculation are handled using Langfuse, which tracks API latency, token usage, and error rates, helping ensure the system remains performant, reliable, and cost-aware.
How can you add langfuse to your application
- First, install the Langfuse Python package via pip.
pip install langfuse
- After signing up on Langfuse, create an API key and save it in your
.envfile.
# Langfuse
LANGFUSE_SECRET_KEY = "sk-lf-c0.."
LANGFUSE_PUBLIC_KEY = "pk-lf-a0.."
LANGFUSE_BASE_URL = "https://us.cloud.langfuse.com"
- Then, update the import to Langfuse to track LLM costs and traces.
# instead of: import openai
from langfuse.openai import openai
- Langfuse Dashboard
Error Handling
OCR failures
Partial document parsing
LLM timeouts
Example
@upload_router.post("/analyze/{file_id}", response_model=AnalysisResponse)
async def analyze_report_file(
    file_id: str,
    db: AsyncSession = Depends(get_db),
    current_user=Depends(get_current_user)
):
    """
    Analyze a processed report and extract structured medical information.
    Returns summary, key findings, and recommendations.
    """
    try:
        # Verify ownership
        result = await db.execute(
            select(Report).where(
                Report.report_id == file_id,
                Report.user_id == current_user.user_id
            )
        )
        report = result.scalar_one_or_none()

        if not report:
            raise HTTPException(status_code=404, detail="Report not found")

        analysis = await analyze_report(file_id, db, openai_client)
        return analysis

    except HTTPException:
        raise
    except Exception as e:
        raise HTTPException(status_code=500, detail=f"Analysis failed: {str(e)}")
The system degrades gracefully, not catastrophically.
Testing Strategy
API validation
RAG response quality checks
UI usability testing
Failure scenario simulations
Testing builds user trust.
Limitations & Future Scope
Current Limitations
Not a diagnostic tool
Depends on report quality
Limited medical domain coverage
Future Enhancements
Wearable data integration
Multilingual support
Doctor dashboards
If there’s one takeaway from building MediTwin, it’s this: good healthcare AI should reduce confusion, not add to it. This project isn’t about replacing doctors or making diagnoses - it’s about helping people understand their reports, ask better questions, and feel a little more confident. I hope this walkthrough helps you think clearly about building practical, responsible RAG applications in the real world.
Connect with me :
LinkedIn : https://www.linkedin.com/in/rohitbrajput/
GitHub : github.com/rohit-rajput1
Twitter : twitter.com/rohitrajput31
Instagram : instagram.com/rohitrajput_36
Website : rohitbrajput.in
